Introduction:
Welcome to the world of React Redux! If you’re diving into React development and looking to manage your application’s state efficiently, you’ve come to the right place. In this guide, we’ll walk through the fundamentals of React Redux, explaining what it is, why it’s used, and how you can get started with it in your React.js projects.
What is React Redux?
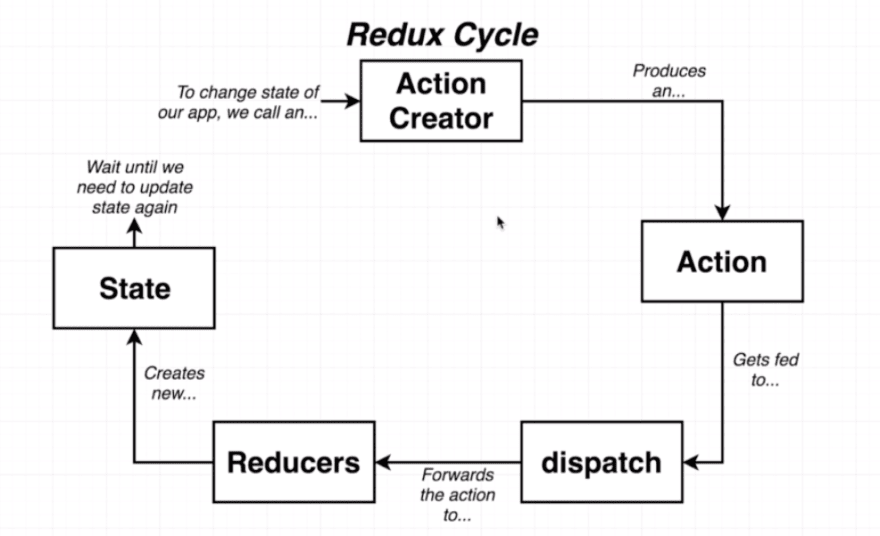
React Redux is a predictable state container for JavaScript apps. It helps you manage the state of your React application in a more organized and efficient way by introducing the concept of a single source of truth – the Redux store. Redux provides a centralized location to store your application’s state and dispatch actions to update that state.
Why Use React Redux?
Using React Redux offers several benefits:
- Predictable State Management: Redux provides a clear and predictable way to manage your application’s state, making it easier to debug and maintain.
- Centralized State: With Redux, all of your application’s state is stored in a single location, making it easier to access and modify from anywhere in your application.
- Scalability: Redux scales well with large applications, as it encourages a structured approach to managing state.
- Time Travel Debugging: Redux DevTools allow you to track and debug state changes over time, making it easier to identify and fix bugs in your application.

Step 1:
First, let’s install Redux and React Redux in your project using npm or yarn:
npm install redux react-redux
or
yarn add redux react-redux
Step 2: Set Up the Redux Store :-
Create a Redux store to hold your application’s state. Define reducers to specify how the state should change in response to actions.
// store.js
import { createStore } from 'redux';
import rootReducer from './reducers';

const store = createStore(rootReducer);

export default store;
Step 3: Integrate Redux with React :-
Connect your React components to the Redux store using the connect function provided by React Redux.
// App.js
import React from 'react';
import { Provider } from 'react-redux';
import store from './store';
import MyComponent from './MyComponent';

function App() {
  return (
    <Provider store={store}>
      <div className="App">
        <MyComponent />
      </div>
    </Provider>
  );
}

export default App;
Step 4: Dispatch Actions :-
Trigger state changes by dispatching actions from your components.
// actions.js
export const incrementCounter = () => ({
  type: 'INCREMENT_COUNTER',
});
Step 5: Update the Redux Store :-
Define reducers to specify how the state should be updated in response to dispatched actions.
// reducers.js
const initialState = {
  counter: 0,
};

const rootReducer = (state = initialState, action) => {
  switch (action.type) {
    case 'INCREMENT_COUNTER':
      return {
        ...state,
        counter: state.counter + 1,
      };
    default:
      return state;
  }
};

export default rootReducer;
Step 6 : Access State in Components :-
Use the mapStateToProps function to access state from the Redux store in your React components.
// MyComponent.js
import React from 'react';
import { connect } from 'react-redux';

const MyComponent = ({ counter }) => (
  <div>
    <p>Counter: {counter}</p>
  </div>
);

const mapStateToProps = (state) => ({
  counter: state.counter,
});

export default connect(mapStateToProps)(MyComponent);
Step 7: Dispatch Actions from Components:-
Use the mapDispatchToProps function to map action creators to props in your components.
// MyComponent.js (continued)
import React from 'react';
import { connect } from 'react-redux';
import { incrementCounter } from './actions';

const MyComponent = ({ counter, increment }) => (
  <div>
    <p>Counter: {counter}</p>
    <button onClick={increment}>Increment</button>
  </div>
);

const mapStateToProps = (state) => ({
  counter: state.counter,
});

const mapDispatchToProps = {
  increment: incrementCounter,
};

export default connect(mapStateToProps, mapDispatchToProps)(MyComponent);
Conclusion:
You’ve now learned how to get started with React Redux! By following these examples, you can efficiently manage the state of your React.js applications and build more scalable and maintainable code. Experiment with Redux in your projects and explore its powerful features further.